

No matter you are new or experienced Tesla owner, please read this blog to deepen the knowledge to your Tesla car.
-
Use the "Park" button to park in an emergency
In an emergency, if the braking function is not normal, please long press the "Park" button on the shift lever to stop the car. Do not park using this method unless absolutely necessary.
-
Restart the touch screen in case of no response or abnormality
If the touch screen does not respond or is abnormal, restart it to rectify the problem.
Warning: Restart the touch screen only when the vehicle is stopped and in gear. During the restart, the vehicle status display, safety warning, rear-view camera and other information are not visible.

- Shift into the parking gear.
- Press and hold the two scroll buttons on the steering wheel until the touch screen turns black.
- After a few seconds, the Tesla logo appears. Wait about 30 seconds for the touch screen to restart. After a few minutes, if the touch screen still has no response or abnormal behavior, please try to turn off the vehicle in a cycle.
-
Shift to neutral
After moving the shift lever up or down to the first gear, keep it in this position for more than 1 second to change into neutral gear. When in neutral, the Model 3 can glide freely without stepping on the brake pedal.
Note: If the driving speed is less than about 8 km/h, you must press the brake pedal to switch to a gear other than neutral.
The Model 3 automatically shifts into gear when you leave the driver's seat. To stay in neutral, use the touch screen to enable transport mode.
-
Open the car door when the battery runs out
Once the Model 3 runs out of juice, these electric buttons on the top of the doors become deactivated. Please pull the manual door release in front of the front window switch.
To open the front door of the Model 3 without power, pull up the manual door release device located in front of the window switch.

Note: Only the front doors of Model 3 are equipped with manual door releases.
The Model Y also has a manual door release in the rear door:

- Remove the mat from the bottom of the back door cover.
- Press the red lock plate to remove the access door.
- Pull forward the mechanical separation cable.
-
Adjust the opening height of the electric trunk cover
The opening height of the electric trunk cover (if equipped) can be adjusted to facilitate maintenance and it can also avoid touching low roofs or objects (such as garage doors or lights):
- Open the trunk cover, and then manually lower or raise it to the required opening height.
- Press and hold the button under the trunk cover for 3s until you hear the confirmation beep.
- Confirm that the required height has been set by closing the power trunk cover and then reopening it.
-
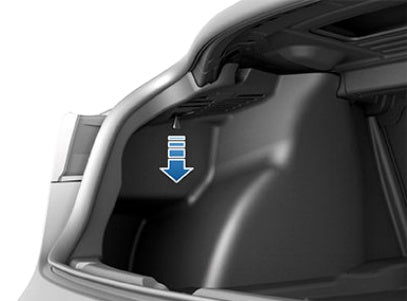
Interior emergency trunk opening
When the Model 3 runs out of power, it can also be opened from the inside using a mechanical unlocking mechanism that lights up on the inside of the trunk. The mechanical unlocking device also allows the person locked inside to get out.

- Press and hold the lit button in the direction of the arrow to release the latch.
- Open the trunk.
-
Internal emergencyfront trunk opening
The inner opening button on the inside of the front trunk can make the person locked inside come out.

Press the inner open button to open the front trunk, and then lift the front trunk up.
-
Open the front trunk without power supply
When Model 3 does not have 12V power supply (this rarely happens), you will not be able to open the front trunk through the touch screen, remote key or mobile phone application. In this case, open the front trunk:
Note: If Model 3 is locked and has 12V power supply, the following operations will not open the front trunk.
- Find an external 12V power supply (such as portable emergency power supply).
- Press and hold the upper right edge of the cover plate until it turns inward, and then slowly pull the raised part towards you to release the towing hole cover plate.
Note: The towing hole cover plate is connected to the black negative (-) terminal of the vehicle.

-
Pull out two wires from the opening of the traction hole to expose two columns.

- Connect the red positive (+) cable of 12V power supply to the red positive (+) end.
- Connect the black negative (-) cable of 12V power supply to the black negative (-) terminal.

Note: If the external 12V power supply is connected on these terminals, only the front spare box cover can be released. It shall not be used for charging 12V batteries.
- Start the external power supply (please refer to the manufacturer's instructions). The front spare compartment lid lock is immediately released. You can now open the front spare compartment lid to enter the front spare compartment area.
- When disconnecting the cables at both ends, please disconnect the black negative (-) cable first.
- If the vehicle is being moved to the flatbed truck, do not replace the towing hole cover at this time. If necessary, when replacing the towing eye cover, insert the wire into the towing eye opening and align the towing eye cover into place, then turn it into place.

-
The front passenger airbag turned on and off
When children take the front passenger seat (even if the child safety seat or booster seat is used), the front passenger airbag must be disabled to prevent the airbag from hurting children in case of collision.
To disable the front passenger airbag, click Control>Safety&Security>Front passenger airbag
-
Driver sets convenient access mode
You can define the convenient entry and exit settings, which will move the steering wheel and driver's seat to facilitate entry and exit of Model 3. Any driver can use this setting after associating the convenient access setting with its driver setting.
When the "convenient access" setting is associated with the driver setting, the steering wheel and the driver seat seat will be automatically adjusted to facilitate the exit when the parking gear is engaged and the driver's seat belt is unfastened.
After returning to the vehicle and pressing the brake pedal, the settings will automatically be adjusted back to the settings used by the latest driver settings (if the vehicle key is linked to the driver settings, press the key operation).
If you want to use convenient access through driver settings, please make sure to select the Use convenient access check box.
-
The rearview mirror automatically tilts when reversing
When the Model 3 is shifted into reverse gear, the two exterior rear-view mirrors can automatically tilt downward. When shifting into any other gear, the rear view mirror returns to the normal (up) position.
To turn this function on or off, click Control>Quick Control>Mirror>Mirror Auto Tilt.
-
Control the high beam headlight
Move the steering lamp lever outward and release it to continuously light up the high beam headlights. To cancel, move the lever outward again.
To flash the high beam headlights briefly, you can release them by moving the joystick inward.
When light is detected in front of Model 3 (for example, oncoming vehicle), the high beam lamp will automatically switch to the low beam lamp. To turn this function on or off, go to Quick Control or click Control>Lights>Auto High Beam.
-
Adjust the following distance
To adjust the following distance you want Model 3 to keep with the vehicle in front, press the right wheel button of the steering wheel to the left or right, and select a setting from setting 1 (minimum following distance) to 7 (maximum following distance).
Each setting corresponds to a time-based distance, where the time-based distance represents the time required for Model 3 to reach the front and rear bumper positions from the current position.
-
Escape mode
Under normal circumstances, it should not be enabled. Enable this only if you subjectively want the wheel to idle, such as:
- Start on a loose surface, such as gravel or snow.
- The vehicle is running in deep snow, sand or dirt.
- When climbing out of a hole or trench.
To idle the wheels, go to Control > Drive > Traction Control > Escape Start.
-
Sound the horn to save the dash cam video
Go to Control>Security&Security>Horn to save the video>On to enable.
In case of emergency, sound the horn, and the video clip of the last ten minutes will be saved. You can also click the DASH CAM icon at the top of the touch screen to save the DASH CAM video clip.
-
Lifting procedure
Make sure that any non-Tesla repair shop knows these lifting points.
Place the lift arm pad under the specified body lifting point as shown in the figure.
Warning: Do not place the lift arm pad under the battery or the side rail (shown in red).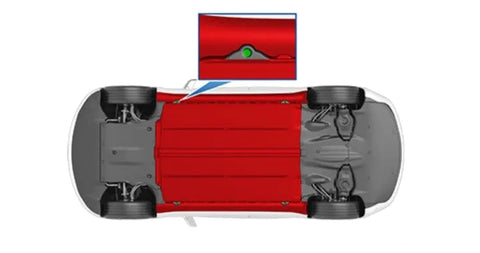
-
Abnormal window
If the window works abnormally (touch the bright bar, it cannot be opened or closed correctly, the window slows down slowly when the door is opened, etc.), the problem can be solved through window calibration.
Calibrate the window:
- Close the doors of the affected windows.
- Sit in the driver's seat and close the driver's door.
- Use the window switch on the driver's door to raise the affected window until it stops completely.
- Use the window switch on the driver's door to lower the affected window until it stops completely.
- Repeat step 3 and raise the affected window until it stops completely.
-
Adjust the opening height of the trunk cover
The opening height of the electric trunk lid (if equipped) can be adjusted to facilitate maintenance and handling, and it can also avoid touching low roofs or objects (such as garage doors or lights):
- Open the trunk cover, and then manually lower or raise it to the required opening height.
- Press and hold the button under the trunk cover for three seconds until you hear the confirmation beep.
- Confirm that the required height has been set by closing the power trunk cover and then reopening it.
-
Car wash mode
In the car wash mode, the vehicle will lock the charging port, and at the same time, the vehicle will close all windows and luggage compartments, turn off the automatic wiper, sentry mode, and turn off the automatic locking function after leaving the vehicle.
Start mode: Control>Service>Car wash mode
-
Cab camera
A cab camera is installed above the rear view mirror, which has no effect at present, and can be covered with adhesive tape or camera cover
-
Manually release the charging cable
If the charging cable cannot be released from the charging interface by conventional methods (using the charging handle release button, touch screen or mobile phone application).
Please strictly follow the following steps:
- Ensure that the vehicle is not charging at present by displaying the charging screen on the touch screen. If necessary, click to stop charging.
- Open the trunk.
- Pull down the charging interface to release the cable to unlock the charging cable.
Warning: Do not try to pull the charging cable out of the charging interface while pulling the release cable. Be sure to pull the release cable before attempting to pull out the charging cable. Failure to follow the instructions may result in electric shock and serious injury.
- Pull out the charging cable from the charging interface.


