Developed for instrument, Tesery dashboard display is an integrated machine compatible with the original Tesla vehicle information, Android system, CarPlay interconnection, Bluetooth, forward blind area,navigation, instrument information display, etc. The structure adopts the non-destructive installation mode of private car mold, and the perfect combination with the center control panel is closer to the style of the original large screen.
The operating system of the product is the open Android system, which can be controlled by the keys of the steering wheel or make telephone calls by voice to simplify the operation and avoid driving safety risks, so that you can travel safely while providing entertainment and personalized high-end products.
Impressive Features
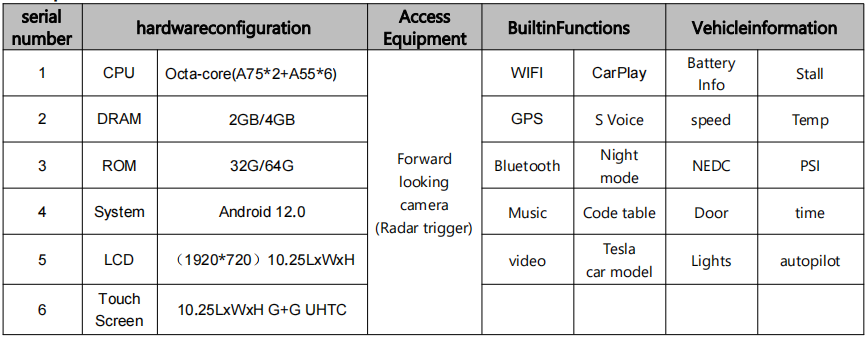
1. Android version 4G
This product uses Android version 4G full network, octa-core processor, DDR:2GB/4GB, ROM:32GB/64GB operating system:
Android12.0 with high performance hardware to run more smoothly, built-in wireless CarPlay mobile Internet, Bluetooth, online music,
online video, Autonavi real-time road condition map navigation, voice control, and add the original car information and code watch style display
2. 1920*720 IPS
The appearance adopts the private mode HD 10.25 inch large screen, customized UI interface, adopts the full fit process to avoid dust,
HD resolution 1920*720 IPS full view screen is closer to the original big screen style.
3. Parameters
4. Maininterface function is introduced

5. Three modes
The screen display has three modes (full screen, Right split screen, Left split screen) can be selected in "VehicleSettings" - "Other" - "screen display mode", restart the machine after saving the effect.

*Note: When the control function is turned off by the button of cruise control or automatic driving, the button of left push right push is to adjust the following distance with the car in front *
How to Operate the Instrument Panel?
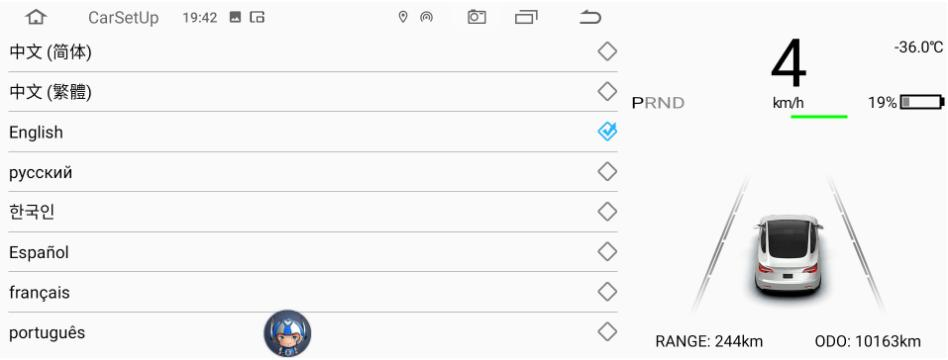
1. Language Setting
car machine into the interface point "vehicle Settings" - "general" - "language choice"
supported languages are as follows: Chinese, English, traditional Chinese,Russian, Korean, French,Spanish, Portuguese, Polish, Dutch
2.Timing
- to set the date and time synchronization network (effective) connect the WIFI
- to set the date and time synchronization navigation (GPS) effectively
- is adjustable for 12 hours, when the default system 24 hours a day
- time can be automatic/manual Settings

3. Version information view
Vehicle Settings - general - version information

4.APP software upgrades
- First turn the U disk into FAT32 format
- Copy the upgrade package to the root directory of the USB flash drive, as shown in Figure 1 below!

- After inserting the USB flash drive into the USB port on the right side of the instrument, the screen will prompt Firmware
- upgrade - Click Install (check "Clear all memory data" and some navigation data will be lost after formatting). Wait for the
- machine upgrade for about 3 minutes, the green interface will jump to the English interface after the upgrade is successful,
- remove the USB flash drive, as shown below!

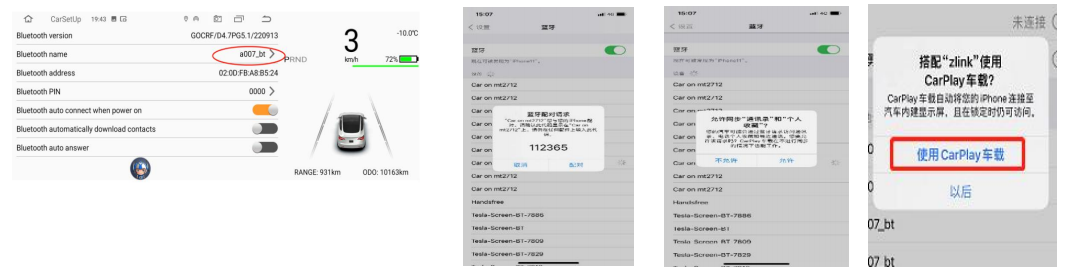
5. Instrument panel with the original car bluetooth connection
- Search the original car Bluetooth and find the Bluetooth "BT1036V2.5.2-...." of the instrument machine. Connect by name
- connection voice will send output through the simulation host
- When the instrument machine plays sound/video sound can be output through the original car large screen horn
★If not connected with the original car can only navigation sound, instrument built-in small speaker
6. WiFi Connection Manager
- Start by turning on your phone's hotspot
- Car machine interface point "vehicle Settings" - "network" search WIFI hotspot connection to connect
- Shortcut to enter, slipping over the screen long press "WIFI" icon to enter the connection
- Note to check the WIFI signal strength
7. Scott map function
- connected wi-fi hotspots or inserted after 4 g card can be real-time navigation
- open navigation application enter the destination into the navigation or voice navigation
- navigation to adjust the size of the voice
- Tap the Sound icon in the upper right corner of the navigation map. A sound will be displayed
- Size progress bar, adjust the size of the sound progress bar can adjust the size of the sound
- close map built-in input method.Click the "Head" icon in the upper left corner of the map interface to enter Settings - Other - built-in input can be closed
- main interface switching three UI
- steering wheel roller press roller long press left key 3 seconds to switch on the right
- right click through the steering wheel on the right side of the wheel to choose corresponding UI
8.main interface way right border to replace custom images
- click right border in can change via USB or change the images in the machine
- According to return after
- choose to like the picture right border refresh automatically to the main interface
- main interface right border quickly switch point under the two custom images with energy recovery
- suggested the best effect is the square: 218 * 218
- supported formats: JPG, PNG
9. PPTV
- click application - video playback - choose the corresponding video files
- play video can click on the picture in picture in the main interface display or drag the position
- main interface, click on the picture in picture to enlarge video double-click can return to the video player
10. Bluetooth connection
- Enable the Bluetooth function of the mobile phone
- in the machine interface "vehicle Settings" - "bluetooth" scan mobile devices
- When the phone's Bluetooth device name is scanned, click the device name to connect
- phone receive pairing code prompts to confirm matching connection
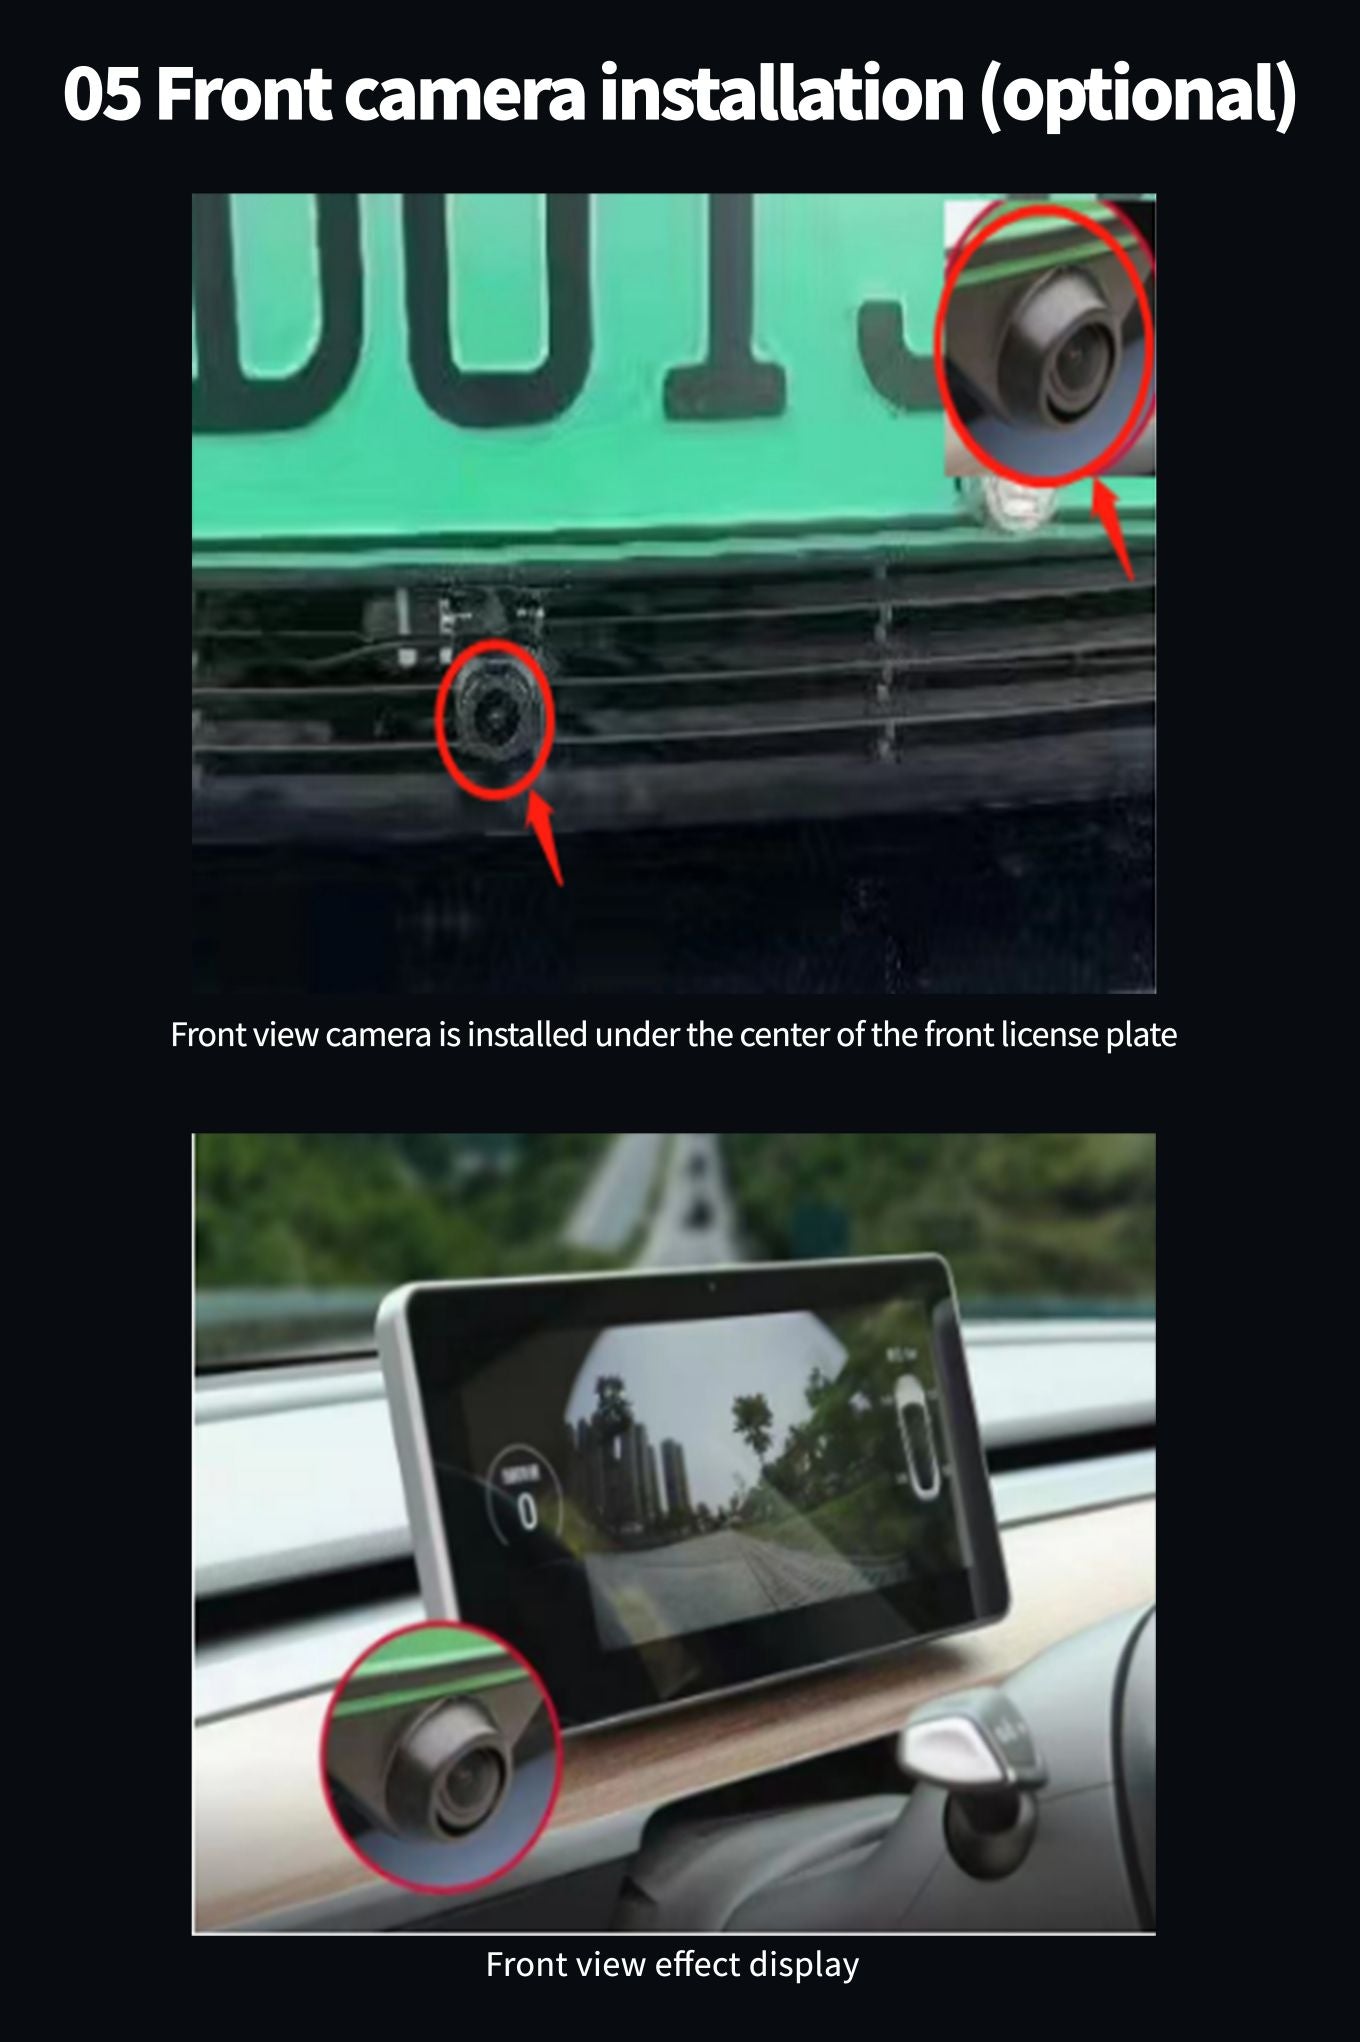
11. HD-FRONT
- Go to "Vehicle Settings" - "Other" - "Forward view Settings"
- visual function before open or close
- when radar is triggered automatically into the top 10 seconds
- When the front view camera is installed, the front view image can be opened. Without the front view, there is no need to open it.
12. factory settings
- "vehicle Settings" - "factory Settings" - 6688 "password"
- can enter the menu set at a lower level
13. navigation application
- into "vehicle Settings" - "navigation"
- path can be set up navigation application
14. choose music application
into "vehicle Settings" - "factory Settings" - "6688" - choose music application
15. boot LOGO Settings
the image resolution (1920 * 720/24).bmp file copy to U the packing list, and named bootlogo. BMP as shown in the figure
below
U disk inserted into the screen on the USB port on the right point in turn: vehicle factory Settings - > set (6688) -- - > LOGO
boot choice - > sure wait for set up successfully
after the success of the set, remove the usb flash drive, machine electricity boot images can still be memory
16. Change WallPaper
wallpaper (resolution 1920 * 720/32) first PNG format file copy to U the packing list, and name into which wallpaper *. PNG as
shown in figure
U disk inserted into the screen on the USB port on the right point in turn: vehicle factory Settings - > set (6688) - > select
wallpaper - > sure wait for set up successfully

17. models color selection
into "vehicle Settings" - "factory set up 6688" - "models color choice"
is selected automatically when synchronization original car models
manual can make models colour (silver/white/red/blue/black)
18. to install the APP
into the "application" - "document management" - "USB" - find U disk inside needed to install the apk - point Settings - allows
applications from the source of open - points in the top right corner of the back - point - after installing or open
19. Mobile interconnection wireless connection CarPlay
First connect WIFI or insert 4G card to activate CayPlay
bluetooth function, open the IPhone into the machine scan bluetooth device name point connection, mobile phone received
the bluetooth pairing request to choose matching (figure 1)
phone received bounced "allows synchronization" address book "and" personal collection "option allows (figure 2)
phone received bounced "use CarPlay on-board" choose to use CarPlay vehicle (figure 3), connected (figure 4), the connection
is successful (figure 5)

20. Wired Android auto
Android auto requires a phone that supports Google services and is installed in the Google play store:
After installing the above apps, click on Android Auto, and install the corresponding services and updates according to the prompts.● Android auto Correct operation steps for wired connection
(Phones need to support Google services and have auto software installed)
1.Open zlink software --> 2. Insert Android phone to USB --> 3. The connection success screen is shown
- Android auto Correct steps for wireless connection
(Phones need to support Google services and have auto software installed)
Android auto wireless connection:Connect the Android phone to the USB OTG interface of the car (only OTG port is supported, other
usb ports are not supported), and the Android auto (mobile phone) interface will be displayed after successful connection

21. Common troubleshooting guide

How to Install the Instrument Panel?